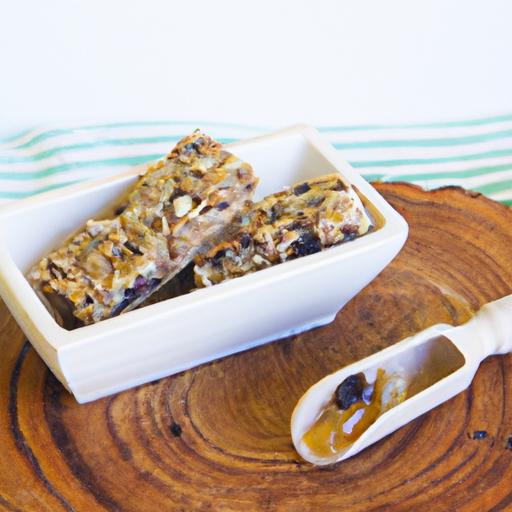
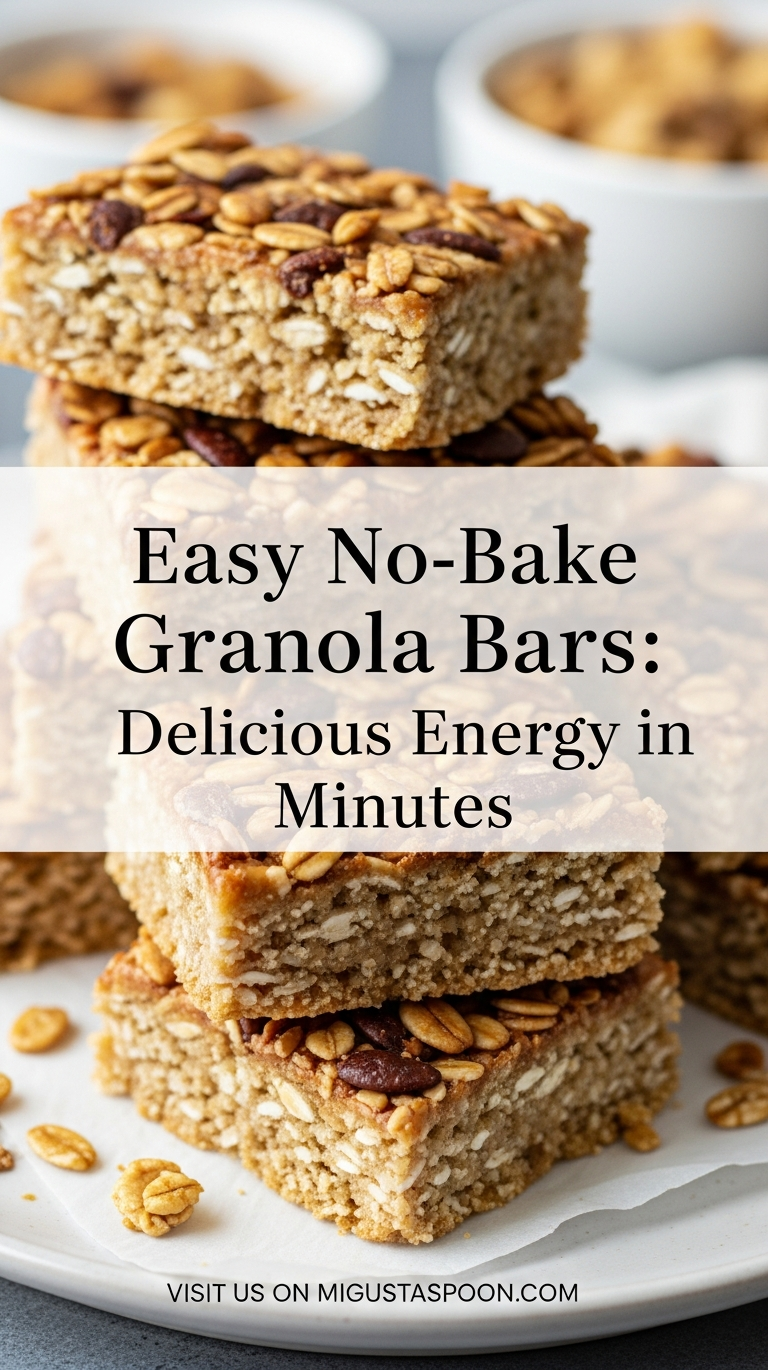
When hunger strikes and time is tight, reaching for a quick, wholesome snack can feel like a challenge. Enter the easy no-bake granola bar-a perfect blend of crunchy oats, sweet natural flavors, and energizing ingredients, all coming together in minutes without turning on the oven. Whether you’re rushing out the door, need a midday boost, or simply crave a tasty treat, these effortless bars offer flavorful energy that fits seamlessly into your busy lifestyle.Let’s dive into how you can whip up these nutritious, customizable snacks with minimal fuss and maximum flavor.
Easy No-Bake Granola Bars offer a perfect blend of convenience and nourishment, transforming pantry staples into a satisfying energy boost you can prepare in minutes. Originating from the need for wholesome snacks on-the-go, these bars have quickly become a kitchen favorite for busy mornings, post-workout refuels, or anytime you crave a hearty yet guilt-free bite. Their beauty lies in their simplicity: just combine your favorite ingredients, press, chill, and enjoy. the versatility of no-bake granola bars empowers you to customize flavors and textures, making each batch uniquely yours.
Prep and Cook Time
- Readiness: 10 minutes
- Chilling: 1 hour (no baking required!)
- Total Time: Approximately 1 hour 10 minutes
Yield
- 12 bars (depending on portion size)
Difficulty Level
- Easy – Perfect for cooks of all skill levels
Ingredients
- 2 cups rolled oats (old-fashioned, for chewy texture)
- 1/2 cup natural peanut butter (or almond butter for a variation)
- 1/3 cup honey (raw or clover honey works beautifully)
- 1/4 cup chopped nuts (walnuts, almonds, or pecans)
- 1/4 cup mini dark chocolate chips (optional, for a touch of indulgence)
- 1/4 cup shredded unsweetened coconut
- 1 teaspoon vanilla extract
- 1/8 teaspoon sea salt
- 2 tablespoons chia seeds or flaxseeds (optional, for added nutrition)
Instructions
- Prepare your workspace: Line an 8×8-inch square pan with parchment paper, leaving some overhang for easy removal.
- mix the wet ingredients: In a microwave-safe bowl, gently warm the peanut butter and honey for about 20-30 seconds until smooth and pourable. Stir in the vanilla extract and sea salt.
- combine dry ingredients: in a large mixing bowl,stir together the rolled oats,chopped nuts,shredded coconut,chia or flaxseeds,and chocolate chips.
- Incorporate wet and dry: Pour the warm peanut butter mixture over the dry ingredients. Using a sturdy spatula or wooden spoon, mix thoroughly until every oat and nut is coated evenly-this ensures your bars hold together perfectly.
- Press the mixture: Transfer the mixture into the prepared pan. Press firmly and evenly using a spatula or your hands to compact the mixture tightly into the pan’s corners and edges.This step is essential to avoid crumbly bars.
- Chill and set: Place the pan in the refrigerator for at least 1 hour, allowing the bars to firm up and achieve the ideal chewy texture.
- Slice and store: Once set, lift the bars out using the parchment paper overhang. Cut into 12 equal portions and store in an airtight container. Keep refrigerated for up to a week or freeze for longer freshness.
Tips and Tricks to Customize Your Bars for Every Taste and Need
Feel free to experiment by swapping peanut butter for tahini or sunflower seed butter for a nut-free option. Swap honey with maple syrup or agave nectar for a vegan-kind treat. Boost texture and protein by adding puffed quinoa, hemp hearts, or dried fruit such as cranberries or chopped apricots.
For a crunchier bite, toast your oats and nuts lightly on a skillet until golden before mixing. To enhance chewiness, substitute some oats for crispy rice cereal. keep the bars dense and holdable by pressing firmly and ensuring even chilling.
Chef’s Notes
- Make-Ahead: These bars keep wonderfully in the fridge and also freeze well for up to 3 months-perfect for batch prepping.
- Binding Issue? If your mixture feels crumbly, add a tablespoon more peanut butter or honey to improve stickiness.
- Allergy-Friendly: Use seed butters instead of nuts and avoid chocolate if sensitive.
- Sweetness Level: Adjust honey or syrup quantity according to preference or substitute with brown rice syrup for a milder sweetness.
- Texture Tip: For softer bars, add a dollop of Greek yogurt or mashed banana to the wet ingredients.
Serving Suggestions
Enjoy your bars as a grab-and-go breakfast with a cup of coffee or pair them with Greek yogurt and fresh berries for a balanced snack.For an elegant touch at brunch, cut bars into bite-sized squares and serve on a platter garnished with edible flowers and a sprinkle of cinnamon. Wrap individual bars in parchment paper and tie with twine for gorgeous homemade gifts or school snacks.

| Nutrient | Amount per Bar |
|---|---|
| Calories | 180 kcal |
| Protein | 5 g |
| Carbohydrates | 22 g |
| Fat | 8 g |
For more wholesome snack ideas, check out our Healthy snack Recipes.Learn about the nutritional benefits of honey and natural sweeteners in this Harvard Nutrition Source article.
Q&A
Q&A: Easy No-Bake Granola Bars – Delicious Energy in minutes
Q1: What makes no-bake granola bars a great snack option?
A1: No-bake granola bars are the ultimate hassle-free snack! They combine wholesome ingredients with minimal prep time, giving you a delicious energy boost without turning on the oven. Perfect for busy mornings, quick hikes, or a midday pick-me-up when you need fuel fast.
Q2: Are these bars healthy or just tasty treats?
A2: They strike a beautiful balance between health and flavor! Using natural sweeteners like honey or maple syrup, whole oats, nuts, and dried fruits, these bars offer fiber, protein, and essential nutrients-making them a smarter choice over processed snacks.
Q3: How long does it realy take to make these granola bars?
A3: Less time than brewing your morning coffee! from mixing to setting, these bars come together in about 10-15 minutes. After chilling,you have ready-to-eat,energy-packed bars that will power you through your day.
Q4: Can I customize the ingredients to suit my taste or dietary needs?
A4: Absolutely! No-bake granola bars are wonderfully versatile.Swap nuts for seeds to make them nut-free,add chocolate chips for a sweet twist,or toss in superfoods like chia seeds or flax for an extra health punch.Your snack, your rules!
Q5: How do I store these bars to keep them fresh?
A5: Store your homemade bars in an airtight container in the fridge for up to a week, or freeze them for longer storage. That way, there’s always a quick, delicious snack at your fingertips whenever hunger strikes.
Q6: Can kids get involved in making these bars?
A6: Definitely! No-bake recipes are kid-friendly and fun. It’s a hands-on way to teach little ones about healthy eating and get creative with mix-ins-plus,they’ll be proud to snack on a treat they helped craft.
Q7: What’s the secret to getting the bars to stick together perfectly?
A7: The magic lies in the sticky binder-usually a combo of honey, nut butter, or syrup. Warm these slightly to create a gooey mix that holds everything together nicely once chilled. Pressing the mixture firmly into the pan also helps keep those bars intact.
Q8: Can these granola bars replace a meal?
A8: While packed with good-for-you ingredients, they’re best as a snack or energy boost rather than a full meal. Pair with fruit or a yogurt for a more balanced bite if you’re on the go but need extra sustenance.
with these simple no-bake granola bars in your culinary toolkit,delicious energy is always just minutes away!
In Summary
Whipping up these easy no-bake granola bars is proof that delicious,energizing snacks don’t have to be elaborate or time-consuming. With just a handful of wholesome ingredients and a few minutes of effort, you can create a nourishing treat that fuels your day, whether you’re rushing out the door or settling in for a cozy afternoon. So next time hunger strikes, skip the store-bought options laden with additives and embrace the simple joy of homemade granola bars – your body and taste buds will thank you!